Quantcast
Channel: .Net Core | MVC | HTML Agility Pack | SQL | Technology Crowds
Viewing all 544 articles
Browse latest View live

Guid in SQL

$
0
0
GUID is generated to unique identifier No. GUID is created through network card.
SQL Server have data type uniqueidentifier, A sample database snapshot has been provided below: 

uniqueidentifier
Guid in SQL

--Code snippet shwoing uniqueidentifier in a variable
DECLARE @TechnologyCrowdsID uniqueidentifier
SET @TechnologyCrowdsID = NEWID()
SELECT @TechnologyCrowdsID


We can generate uniqueidentifier using NEWID() in SQL, I have provided code snippet below:

SELECT NEWID()

SELECT NEWID()

Above code sample shows best example of  Guid in SQL

I have providedC# code snippet to generate following:
Namespace using System;
 
using System;

class TechnologyCrowds
{
    public static void Main()
    {
    Guid Gtc;
   // Create and display the value of two GUIDs.
    Gtc = Guid.NewGuid();
    Console.WriteLine(Gtc);
    Console.WriteLine(Guid.NewGuid());
    }
}

/*
Above code example will produce the below results:
0D1C39FA-D58D-4C4D-A910-33A07116CB89
B1CB4977-AD8C-4D11-8D87-87F471A319F7
*/


How to Schedule Backup in SQL Server 2008?

$
0
0
I am writing about very important part of our development How to schedule backup in SQL Server 2008 R2. We work sometimes offline (at our local machine) or online server, our day-to-day database development backup versions are very important in our SDLC. If we are working & omitting important information from back end MS SQL Server, It pulls back us, we need put extra efforts to recover the lost time of development.  I have provided below steps how to schedule backup in SQL server 2008?
Step 1: Open Microsoft SQL Server Management Studio to schedule a backup plan in SQL Server 2008.
Step 2: Then expand Management > folder

Management

Step 3: Open Management > Maintenance Plans folder.

Management Plans
Step 4: Right Click on “Maintenance Plans” & context Menu contains “New Maintenance Plans…”

New Maintenance Plan

Step 5: A popup window will open to write your Maintenance Plan name.
New Maintenance Plan


Step 6: Left side a toolbox window will open where you can drag & drop “Backup Database Task” option.
Maintenance Plans Task

Step 7: Now two part of window will be shown upper part have Plan Name, Schedule, and Plan Description and lower part contain “Backup Database Task Plan”.


Step 8: Right click on “Backup Database Task Plan” contains on lower part of window and click on “Edit” option.

Backup Database Task

Step 9: Now a new window will pop up where have different options to schedule your back up plan i.e. Connection, Backup Type, Database (Select databases as per requirements) etc.

Backup Database Task

Step 10: Now at the bottom of “Backup Database Task Plan” there is an option to check option “Create a sub-directory of each database” and we can set back plan “Folder” path.

Backup Database Task

Step 11: Upper part of Window there is a button to schedule maintenance day and time.

Maintenance Plan Task

Step 12. A new window will open with name “Job Schedule Properties”, sub plan name, Schedule Name, “Frequency” have Occurs, Recurs every, Daily frequency, Duration, Summary.

Job Schedule Properties

Step 13. You have done all steps now click on “OK” button.

Your Management studio is not showing all list of configuring option, I have given below stored procedure run in your query analyzer & will up show advanced configuration options.

sp_configure 'show advanced options', 1;
GO
RECONFIGURE;
GO
sp_configure 'Agent XPs', 1;
GO
RECONFIGURE
GO


If you have done carefully all above 13 steps, It will help you schedule your backup maintenance plan moreover I have provided snapshots of each item so you can understand well when you are going to implement on to your machine.

How to Publish Website in ASP.Net 4.5

$
0
0

I am here writing upgraded version of How to Publish Website in ASP.Net 4.0, In asp.net 4.5 have new features to earlier version asp.net 4.0. I have listed below key steps those guides us how to publish website in asp.net 4.5

Step 1: We have to build solution successfully, all layers should build successfully, failed should be 0 (zero)

Rebuild Solution to Publish  


Step 2: In output windows you may check that your solution is build successfully with 0 errors.

Build Solution Output

Step 3: Now we have to right click on presentation layer then a property window will appear, then click option “Publish” option.

Publish Option


Step 4: We’re now on “Publish web application” windows, it has outstanding option of Profile, Connection, settings and Preview. Now click on “Profile” menu & it will popup to type “Profile Name”.

Profile


Step 5: Now click on “Connection” option, it have multiple option to select, now we have to select “File System” from Public method option.

Publish Web Application


Step 6: Now enter “Target Location” name, it decides our publish location explicitly.

Publish Method
Step 7: Now our application is published successfully, its already showing in snapshot Publish: 1 succeeded, 0 failed,  0 skipped, please make assure its status should be as mentioned previously.
Publish Output


Step 8: Now our published website showing in our file system.

Published Files


 Above #8 steps shows how to Publish website in ASP.net 4.5


3 Tier Architecture in asp.net

$
0
0

I am publishing next version 3 tier architecture article of asp.net 4.5, In asp.net c# 4.5 have some new up gradations to know when  working on 3 tier architecture,  I have provided key steps to know on 3 tier architecture asp.net 4.5 given below:

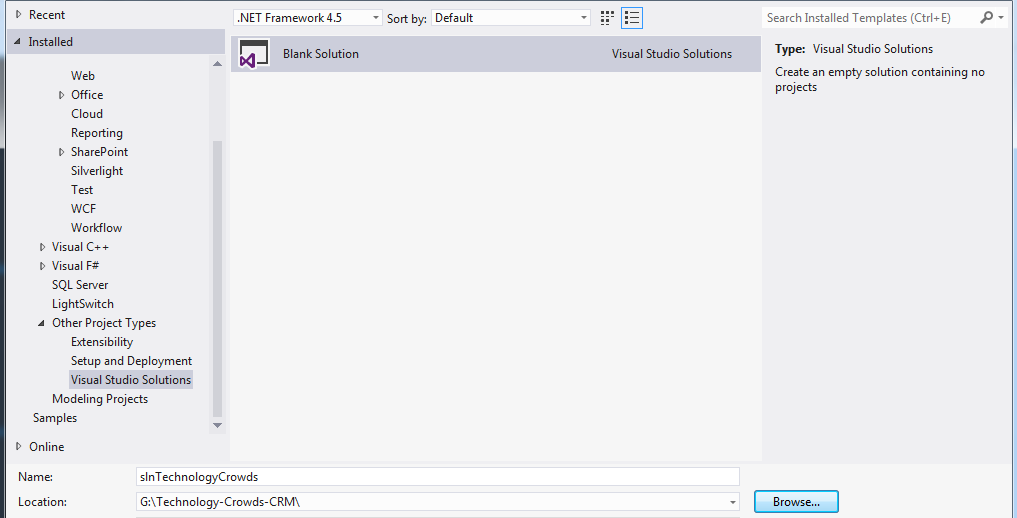
Step 1: We have to add “blank solution” file to the project.

Project Solution

Step 2: Now right click on solution, property window will open, click on “Add” option, sub menu will pop up and then finally click on “New Project…”.


Add New Project


Step 3: Now expand left pane, click on “Visual C#” then select on “Web” option, next one select to option “ASP.NET Web Forms Application”, type Presentation layer name “TC.CRM.Presentation”, select “Location” of the Presentation layer and finally click on “OK” button. Be careful drop down list version information “.NET framework 4.5”.

Presentation Layer


Step 4: Now we have to follow the same steps to design Data Access Layer as we done to accomplish to Presentation layer “TC.CRM.DLL”.  We have to select “Visual C#” then click on “Windows” now on middle section select “Class Library”, type “Name” of layer “TC.CRM.DLL”, select folder option on “Location”, you may set “Location” with click on “Browse…” button. Check always drop down list .net framework option, if not correct version then select desired version “.NET framework 4.5”.

DAL Layer


Step 5: Follow the same initial steps as mentioned in step #2 to design, now expand left pane “Visual C#” then select “Windows” and select “Class Library” in middle pane. Type Entity name ”TC.CRM.Entity”  in “Name” information, set folder option in “Location” information, we may set desired option click on “Browse…” button also. Be careful to set the desired framework “.NET Framework 4.5”.


Entity Layer


Step 6: Now we have to set “Entity layer “ output path in Presentation layer “Bin” folder, It will output all DLL in one folder.

Entity Output Path

 Step 7: Now in the same way, we have set “Output Path” in “Bin” folder of Presentation Layer.

DAL Output Path


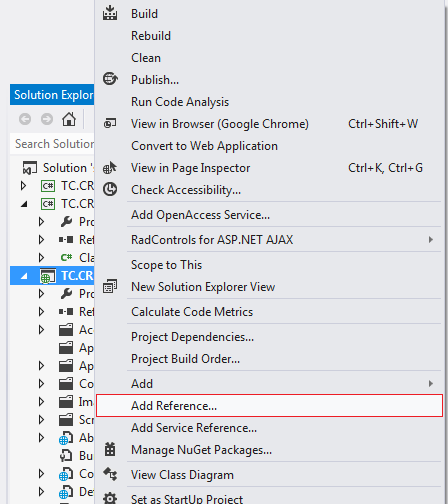
Step 8: Now add reference of “Entity Layer” and “Data Access Layer”.

Add Reference

Step 9: Now you may notice in your presentation layer, two namespaces added “TC.CRM.DAL” and “TC.CRM.Entity”.
Namespace
Step 10: Now you have to add reference in “Data access layer” of “Data Entity layer”. 
Step 11: Now you may notice 3 tier architecture in your “Solution Explore”.


3 Tier Architecture in ASP.net

Step 12
: Now build solution & DLL will be generated in targeted “Bin” folder.

Rebuild Solution

Step 13: Now all DLL are generated in desired folder & you may check DLL i.e. “TC.CRM.DAL.dll”, “TC.CRM.Entity.dll”, “TC.CRM.Presentation.dll”.

Generated DLL


Could not load file or assembly Microsoft.Practices.EnterpriseLibrary.Configuration.Design

$
0
0
I am providing my best solution as following. I am much assure, you will fix your issue after going through given below steps.

1.    You have to check your private assembly “Bin” folder whether it is already place in right folder or not. If you found desired assembly put it in “Bin” folder. Hope it will work fine & know problem will remove permanently.
assembly

2.    You have to check missing assembly in public location in “GAC”, check it carefully whether it is generated on right place or not.
3.    You have to clear all stuff from the web space, now put all fresh stuff into production server, then now compile all source files on server in “Release” mode. Hope it will work for you & known issues would be removed permanently.
4.    It is a very important workaround to work with Fuslogvw.exe (Assembly Binding Log Viewer) for assembly binding. It will help you why the .net framework can’t locate assembly at run time.
4.1    To run this tool you have to open “Visual studio Tools” then right click on “Visual Studio Command Prompt” and runt it as an “administrator”.
4.2    Now at the administrator command prompt, now type “fuslogw”.
5.    We can provide another precious workaround with assembly bind feature fired from web.config.  I have provide web.config sample as following:

 <configuration>
   <runtime>
      <assemblyBinding xmlns="urn:schemas-microsoft-com:asm.v1">
         <dependentAssembly>
            <assemblyIdentity name="YourAssemblyName"
                              publicKeyToken="99abcb445e2a69a1"
                              culture="neutral" />
            <bindingRedirect oldVersion="7.1.0.0"
                             newVersion="7.2.0.0"/>
            <codeBase version="7.2.0.0"
                      href="http://www.technologycrowds.com/myAssembly.dll"/>
         </dependentAssembly>
      </assemblyBinding>
   </runtime>
</configuration>


 6.    I have faced relevant issue then I start one by one all assembly in “Bin” folder, and then replicate the issue that an assembly found that unnecessary located in “Bin” folder named with “Microsoft.Practices.EnterpriseLibrary.Configuration.Design”, I removed it permanently from “Bin” folder then it worked fine me seamlessly.

Who is the best cloud provider

$
0
0

We should know all “pros and cons” of cloud solution providers across the market. There are three main lead solution providers of cloud technology, who serve the cloud industry entirely. I have listed as following:

1.   Google App Engine
2.   Windows Azure
3.   Amazon Elastic Compute Cloud (Amazon EC2)
3.1 Amazon Virtual Private Cloud (Amazon VPC)

Cloud Best Provider

1.  Google App Engine:
It has great flexibility to write application multiple language support environment  i.e. Python, Java, PHP and Go etc. using framework with Django, Flask, webapp2 and Spring, It have also enriched with internet technology Hadoop, MongoDB, C++, Scala, Redis & much more. Google App Engine is using backend as MYSQL. It has the great features to work with different applications to handle heavy traffic, scalable with mobile technology. I have listed official link (https://cloud.google.com/products/app-engine/) of Google App Engine to go over with more detail.

2.  Windows Azure:
It has the great features to handle concurrency, flexibility with great empowerment of components. Windows Azure have surprised cloud consumers across the work with extraordinary performance capability, If you are spending more time with your DB with long time & need your most of time to be involved around database then you should go definitely with SAD (SQL Azure Data base), it has enriched with relational database so it provides the great capability of scalable, flexibility with great performance. SQL Azure is expensive to other both service providers in performance and cost. It has the great features to database backup & keeps up the things as per our expectations. I have providing you below some precious links as following:
i)   Windows Official Website
ii)   GitHub
iii)  Windows Cloud Server Hosting Plans

3.1  Amazon Virtual Private Network (Amazon VPC):  Amazon Virtual network is defined with AWS (Amazon Web Service), you can handle all your own IP Addresses, subnets, networking gateways on isolated system. It has the great feature of multiple connectivity. You can connect with private subnets, public subnets; connect with your datacenter directly securely. This network is more secured and scalable.  It has also the great facility to recover your assets from disaster.
3.2    Amazon Elastic Compute Cloud (Amazon EC2):  It has the great service to compute resize capacity in the clouds. It has the great resize compute facility so it saves your resources in the cloud moreover it encourages to great performance and scalability. I have provided given below links as following:

3.3    Amazon Virtual Private Cloud (Amazon VPC) 
3.4    Amazon Elastic Compute Cloud (Amazon EC2)
3.5    Amazon Virtual Private Cloud (Amazon VPC) Costing
3.6    Amazon Elastic Compute Cloud (Amazon EC2) Costing

If you are a Microsoft technology expert then you should go with Windows Azure, if you are very much familiar with Java or Python then you should go with Google App Engine. If you are expert with Ruby then you should go with Amazon cracking technology. I have provided best information in this article to take decision on Who is the best cloud provider to move ahead.

How to Design Entity Relationship Diagram

$
0
0
Entity Relation Diagram (ER-Diagram) is very important aspect of database designing, with the help of ER Diagram we can define Primary Keys, Foreign Keys, Unique Keys so entire relations in our schema. I have suggested key steps to design fantastic ER-Diagram.


Step 1: On very first step connect to “Object Explorer Object”, and then select Server Type, Server Name, User name & password then click on “Connect”, then you show database lists under “Databases”, then expand specific database “Appsient_Db” to design ER Model, now you will find “Database Diagrams” folder, right click and on click on very first property “New Database Diagram”.

New-Database-Diagram


Step 2: Now you will pop up next window of “Add Table”, you have to add tables from the list which are you dealing with ER Model.

Tables


Step 3:  Now you have to set primary keys, foreign keys, unique keys etc, here you can set all tables relational entity.

ER-Model-View


Step 4: Table View:  You have to “right click” on specific database object then you will list properties, now I am highlighting important features “Standard”, now we can list “Data Type”, “Allow Nulls”, so a very extensive view of our Entity relational diagram.


Table-View-Standard


Step 5: Now we have to save the “Diagram” permanently in our database.

Table-View-Standard

Step 6: Finally you will see ER Diagram “dbo.TC-ER-Diagram” under folder “Database Diagrams”.

dbo.TC-ER-Diagram


I have provided very prestigious above 6 steps which depicts very clearly How to Design Entity Relationship Diagram, this is very important when are we going to design database to provide our database to control fully performance, cost, concurrency, scalable and flexibility.

Online Document Editing in ASP.NET C#

$
0
0
I got requirement to make document online. I started to look for third party controls, but this kind of requirement through third party very rare in across global market, only few solutions with third party solutions, I was some very specific requirement to fulfill this idea. I need to edit document online & save back to his earlier location. Here is www.stackoverflow.com question (http://stackoverflow.com/questions/1839616/online-document-editing-in-asp-net) question which is very close to this requirement. I have few most brilliant solutions as following:

Online-Editing-Document

1.    TextControl (www.TextControl.com), it has very good solution to resolve online Edit document but it has also limitations, it works only for IE 6 Max, it does not work for Chrome, Firefox (FF), Safari, Opera. After the words with Textcontrol.com helpline they told, working for the above 6.0 IE and also working for other cross web browsers (Firefox, Chrome, Opera, Safari etc.) compatibility due to not supporting with HTML 5. They (Text Control support) told this would be working fully for all cross browsers after mid 2014.
2.    Next choice to work with online Document Editing is with Google docs application, they provide the API to work with C#, here is link (https://developers.google.com/google-apps/documents-list/?hl=en&csw=1) which is work closely with C#.
3.    One more brilliant solution is www.Aspose.com who provides online PDF editing and we can save back to our earlier location. It has also limitations so you have to analyze your requirements then judge best 3 party component for online Document Editing in ASP.Net C#
4.    Finally, it has proven solution with www.devexpress.com  (http://help.devexpress.com/#AspNet/CustomDocument8999), it has the complete solution for online Document Editing in ASP.Net C#, you have to apply more tricks to play fully as per your expectations.

I have provided above 4 points to resolve your online Document Editing in ASP.Net C#, Point no 4 worked well for my requirements seamlessly, but we have still 3 more choices to accomplish our requirements. I have looked for other choices also but they were not so matured to our requirements.


How to Open Skype Multiple Account on Mac

$
0
0
I have already written a article on How to Open Skype Multiple Account in Microsoft windows, in this article, I have taken chance real time how to open Skype Multiple Account on Mac operating system. I have suggested some important steps to make it happen as following:

How To Open Skype Multiple Account on Mac


1. You have to run as usually for first instance of Skype on Mac operating system.
2. Now to open second instance on Mac OS, you have to open terminal and write the given command “sudo /Applications/Skype.app/Contents/MacOS/Skype /secondary” without double quotes or you can copy & paste highlighted command.
3. Now system will ask you to type the password, you have to enter your password of your Mac machine or using for installing the software into your Mac machine.
4. After entering the correct Mac machine password, a new window will pop up to enter the password of your second instance of Skype. Type here your second instance of Skype password.
5. Now you have successfully entered into second instance of Skype, you may now close terminal window and run seamlessly second instance of Skype.

Above 5 steps show brilliantly how to open Skype Multiple Account on Mac machine.

Could not open a connection to SQL Server

$
0
0
I have been running the same issue few days back, throws the exception with the description “provider: Named Pipes Provider, error: 40 - Could not open a connection to SQL Server”on server”.  I have provided key steps below to resolve the issue as following:

Detail Error Description:

A network-related or instance-specific error occurred while establishing a connection to SQL Server. The server was not found or was not accessible. Verify that the instance name is correct and that SQL Server is configured to allow remote connections. (provider: Named Pipes Provider, error: 40 - Could not open a connection to SQL Server)
Description: An unhandled exception occurred during the execution of the current web request. Please review the stack trace for more information about the error and where it originated in the code.
Exception Details: System.Data.SqlClient.SqlException: A network-related or instance-specific error occurred while establishing a connection to SQL Server. The server was not found or was not accessible. Verify that the instance name is correct and that SQL Server is configured to allow remote connections. (provider: Named Pipes Provider, error: 40 - Could not open a connection to SQL Server)
Version Information: Microsoft .NET Framework Version:4.0.30319; ASP.NET Version:4.0.30319.1016


Step 1:    First Step check your SQL services are running fine.

Step 2:    Click on “Start Window” and expand “Microsoft SQL Server 2008 R2” and click on “SQL Server Configuration Manager”.

SQL-Server-Configuration-Manager

Step 3:   Now click on left pane “SQL Server Services” and check for “SQL Server (SQLEXPRESS)” running or not, if it is in green color then it’s working fine.


SQL Server (SQLEXPRESS)


Step 4:  Now check for “SQL Server (MSSQLSERVER)”, it should be in green color means running fine.

SQL Server (MSSQLSERVER)

Step 5: Now check for “SQL Server Browser” running or not, you have to make sure is green marked.


SQL Server Browser


Step 6: Now click on “Aliases“ left pane, make assure on right pane that  there should be empty aliases, if requires then should recreate from fresh.

Aliases

Step 7: Now check for SQL Server Default Portal 1433, if you have not already added then follow to open “Ctrl + R”, type “Firewall.cpl” then Firewall will open and Click on “Advanced Settings”.

Advanced Settings


Step 8:
Click on “Inbound Rules” in left pane and click on right pane “New Rule”.

New Rule


Step 9: Then Click on “Protocol and Ports” and click on “Specific local ports” and write SQL default Port No “1433”.

Protocol Ports


Step 10: Now write name on SQL Port Name and click on “Finish” button.

 Add Port Name

Step 11: Now click on “Client Protocols” in left pane, next click on right pane “TCP/IP” and click on “Property” then you check that your default Port “1433” has been populated.

SQL Port 1433


Step 12: Now Open “SQL Server Management Studio” and right click, now property window open and click on “Property”.


SQL Server Management Studio

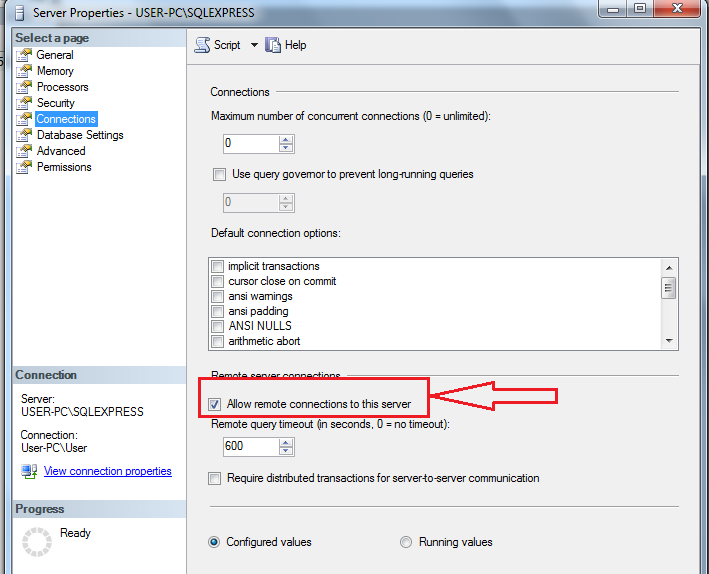
Step 13: Now click on “Connections” option and Check option “Allow remote connections to this server” and click now on “OK”.


Allow remote connections to this server

Hope above steps will eradicate your problem permanently Could not open a connection to SQL Server and work as per your expectations seamlessly.

Login failed for user iis apppool default apppool

MVC 4 Sample

$
0
0
I have suggested below MVC 4 sample project step by step with snapshots attached as well.


Step 1: Open your Visual Studio 2012 as displayed in snapshot to launch your project of MVC 4.

Visual Studio 2012


Step 2: Now you will right here to launch new project, expand “New” menu, sub menu option “Project…” will ready to launch your new MVC 4 solution.[

Controller


Step 3: Now expand on left pane “Templates”, now click on “Visual C#”, and now on right pane will list of Visual Studio 2012 solution, Click on “ASP.Net MVC 4 Web Application” and finally click on “OK” button.

MVC-Solution


Step 4: Now a New window will popup of “New ASP.Net MVC 4 Project”, you have to select “Basic” project and then finally click on “OK” button.

MVC 4 Basic Template

Step 5: Now right click on “Controller” in project, a property list will open, Click on “Add” property, now a sub property will display then click on “Controller”, most important feature of MVC 4 application.

Add Controller


Step 6: Now a popup will open where you have to set your controller name, here I have set controller name “Default1Controller” and finally click on “Add” button.

Default1controller


Step 7: Now right Click of mouse and a property window will pop up, on top of property is “Add View”.

add-view


Step 8: Now a Window will pop up of “Add View”, here you can enter add view name then finally click on “OK”.


Add View


Step 9: Now you are moved to View window, where you can provide your “Welcome Page Title”, HTML, Javascript, Jquery etc.

Page Title


Step 10: Now you can run your application with “F5”, now you are directed on to web browser.  Now you can see your application in running perfectly.

Welcome To MVC 4

Above brilliants Sample steps would help you to know about MVC 4 sample completely.

ASP.NET MVC 4 Release Candidate

1. Per controller configuration
2. Per route message handlers
3. Progress notifications
4. Push content
5. Creating error responses
6. MediaRangeMapping removed
7. Default parameter binding for simple type parameters is now [FromUri]
8. Action selection honors required parameters
9. Customize HTTP parameter bindings.
10. MediaTypeFormatter improvements.
11. Host buffering policy selection
12. Access client certificates in a host agnostic manner.
13. Content negotiation extensibility.
14. Support for returning 406 Not Acceptable responses.
15. Read form data as NameValueCollection or JToken.
16. Multipart improvements.
17. Link generation improvements.
18. Message handler execution order change.
19. Helper for wiring up message handlers.
20. Support for CDNs in ASP.NET Web Optimization.
21. ASP.NET Web API routes and configuration moved to


jQuery Mobile and Mobile Features:

1. Modern HTTP programming model
2. Full support for routes
3. Content negotiation
4. Model binding and validation
5. Filters
6. Query composition
7. Improved testability
8. Code-based configuration
9. Improved support for Inversion of Control (IoC) containers
10. Self-host
11. Create custom help and test pages
12. Monitoring and diagnostics
13. Link generation
14. Web API project template
15. Scaffolding
16. ASP.net Web API [this feature has been introduced to work on

Video:

Connection Timeout In IIS

$
0
0
I have provided below few complete steps to adjust your connection timeout in IIS as following.

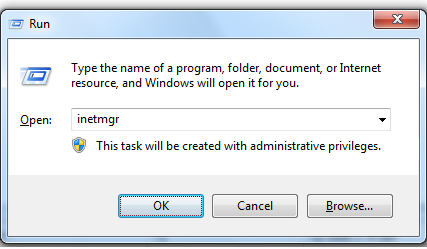
Step 1: Press Windows & run (Win + R) to open your IIS (Internet Information Services) or you can run from your program files also.


                Inetmgr


Step 2: Now you can see your IIS explorer, now explore your IIS, now you have listed “Application Pools” and “Sites”.

Connections


Step 3: Now mouse right click on particular website where you have to set your website connection timeout as depicted in snapshot.

Open Website


Step 4: Now you see the properties click on menu “Manage Web Site” and click on sub menu “Advanced Settings”.

Advanced Settings


Step 5: Now a window will open of “Advanced Settings…”, now explore section “Connection Limits”, and click on “Connection Time-out (seconds)”, now you see in snapshot is 120 seconds, you can set as per your requirements.

Connection-Time-out (seconds)


Hope above steps would help out guide to setup “Connection Time outIn IIS“ issue.

Video

HTTP Error 503. The service is unavailable

$
0
0
I have explained in steps to resolve issue HTTP Error 503. The service is unavailable as below:


Step 1:I ran into issue  “HTTP Error 503. The service is unavailable” when I launched my website through IIS (internet Information Services). I ran website through IIS suddenly popup message me in browser i.e. “HTTP Error 503. The service is unavailable”.


                       HTTP Error 503. The service is unavailable

Step 2: This error ran into because specific website Application pool was stopped or disabled by the circumstances. I have suggested clicking on Application Pool then click on the application pool of specific website then click on Start button to run perfectly.

Application Pool


Step 3: Now you can refresh your web browser or restart the website then you can see that website is running perfectly in web browser.

Welcome to Technology Crowds


Above steps explains how can we resolve the issue “HTTP Error 503. The service is unavailable” in IIS (Internet Information Services) so we can run our website in web browser efficiently.

Video:

How to Add SSL Certificate

$
0
0

I have suggested brilliant 10 steps how to add SSL certificate as below:

Step 1: Open your IIS (Internet Information Services) from start windows or with hotkeys (ctrl + R then type inetmgr).

IIS (Internet Information Services)


Step 2: On the home you will see features of IIS (Internet Information Services)   then click on the “Server Certificates”, you are now in server certifcates menu.

Server Certificates


Step 3: Now click on right side pane Under “Actions”, click on “Create Self Signed certificate”, now you will pop up a new window “Specify Friendly Name”. Type your desired name here and click on “OK” button.

Specify Friendly Name


Step 4: Now you will see “Website4” certificate is now listing in certificate lists.

Server Certificates


Step 5: Now go to your “Sites” and click on specific website for which do you need to install certificate. Now click on “Edit Bindings…”.

Edit Bindings


Step 6: Now click on “Add” button to add signed certificate to your website.

Site Bindings


Step 7: Now you are on “Add Site Binding” windows, here you have to select type “https” & enter IP Address & also defined Port no for your respective website, now at the end on “SSL Certificate”, set your certificate which is created in our earlier steps.


add site bindings


Step 8: Here you can see your certificate click on certificate.

Certificate


Step 9: Here you can see your website “Site Bindings”, now you can click on “Browse” button and it will navigate to view your website in browser explorer.

Site Bindings


Step 10: Here you can see that your web address has included “https”. Now SSL certificate has been installed successfully in your website.

https

Above key steps will help to work out on how to add SSL Certificate.

Video

How to Add FTP Site in IIS

$
0
0
I am publishing another article on how to add FTP Site in IIS, who are newbie in IIS (Add FTP site in IIS). I have provided steps as below:

Step 1: Open your Control panel, now locate “Uninstall or change a program” feature. Click on left pane “Turn Windows features on or off”. Now expand “Internet Information Services”. Now expand “FTP Server” & check all under this node.

Enable FTP Server

Step 2: Open your IIS (Internet Information Services) through shortcut key (Ctrl + R then type “intermgr”). Now right click on “Sites” then click on property “Add FTP Site…”.

Sites

Step 3: Now a popup window “Add FTP Site” will open ”Site Information”, type “FTP site name” then click on “Physical path”, select your website to upload, then click on “next” button to follow next steps.


Site Information


Step 4: Now on next window, a new window “Authentication and Authorization Information” will open, here you can tick check boxes for “Authentication” i.e. Anonymous, Basic. Now drill down “Authorization” allows access to specific user. You can provide access to all users, anonymous users but it is highly recommended “Specific users” due to security reason.


Authenticate And Authorization information


Step 5: In this window, user name is entered “ftp_user”  to allow upload website stuff.


FTP User


Step 6: Now you are on “Binding and SSL Settings” where you can enter your IP address, Port No etc.

Binding and SSL Settings


Step 7: Now you can provide security concerns Read, Write, Read & Execute, Modify, Full Control etc.
Security

Step 8: Now you enter your IP address (host name), User name and password. In this window, you can see that website directory is displayed when you entering correct (host name, user name & password) login detail to access website stuff.

FTP

I have provided above steps to setup FTP Site in IIS. Hope it will help to all as per newbie to setup FTP.

How to Embed Youtube Channel

$
0
0
I have provided key steps to embed YouTube channel into your website.

Steps1: I am providing youtube channel script to embed YouTube Channel with Subscribe button.


<div> <script src="http://www.gmodules.com/ig/ifr?url=http://www.google.com/ig/modules/youtube.xml&up_channel=technologycrowds&synd=open&w=290&h=390&title=&border=%23ffffff%7C3px%2C1px+solid+%23999999&output=js"> </script> </div>

Step: 2 You have to add your user name, you may notice that I have added technologycrowds user name which completes the scripts to populate YouTube channel.

Step: 3 I have provided complete example/preview of TechnogyCrowds YouTube channel as below:


Above steps helps How to Embed YouTube Channel into your website.

What Is IIS

$
0
0
IIS has great feature to deploy website over the internet. It has great extensibility, scalability, easy to manage, modular etc. It runs on Windows platform to deploy website. Microsoft has designed this great component to serve the websites over network. You can manage websites with great security through IIS. Latest features of IIS have introduced a number of new customized features to administrate website across the world. Application pool is a cornerstone which can manage websites security concern and end user can view server sides on client machines. Both PHP and ASP.Net websites can be administered in single machine under IIS.  IIS takes
distributed requests over network then response back to end users. IIS caters websites under web farming mythology. You can deploy websites from recent versions (asp classic) scripting languages to latest versions of ASP.net (cloud technology, Windows Azure) etc. You can install certificates to your websites through IIS. You can launch different ActiveX, Components, DLLs, third party components, Business components, highly secured information etc. through IIS (Internet Information Services). In earlier time, IIS was called Internet Information Server which is now renamed to Internet Information Services.

Free to Use: IIS is free to use, you can download it from Microsoft websites directly. Microsoft Web Installer has introduced a very powerful tool to install different applications, components, services etc. You can streamline your server machine through Microsoft Web Platform Installer and can manage very easily your server machine.

In short, IIS provides a powerful, easy manageable and flexible, extensible, scalable, concurrency tool to manage your website across the planet. World most popular web application such as Umbraco, WordPress, Drupal, Joomla, HTML5, Jquery, Magento, MVC pattern, configuration, management, highly secured applications etc. can launch through IIS (Internet Information Services).
IIS has extensible designed with modular architecture, you can add or remove custom features as per your ever changing demands according to your most demanding situations.
IIS provides great performance to both static and dynamic websites through caching and enhanced compression. CPU throttling, sandboxed have provided the IIS new security feature to empower IIS in latest generations.

Set Rules in Outlook

$
0
0
outlookWhen we are working with outlook emails, as time passes over our outlook size also grows, it is very hard to filter the emails from a long emails bundles. Once we are in huge emails size then our
requirement arise that we can set rules in outlook to specific folders so we can manage the emails in easy way. I have provided below steps how can we set rules in outlook.

Step 1: Open Tools Menu then click on Rules and Alerts.

Rules Alerts


Step 2: Now you are on Rules and Alerts window, next one you have to click on New Rule.


New Rule


Step 3: After click on new rule, next will display Rules Wizard, now click on Moves message from someone to a folder.

 Folder Name

Step 4: Next window will open Create New Folder, and then type your preferred folder name.

 Create New Folder

Step 5: Now you have to choose your folder name, where you need to move your specified emails after applying the rule. Click on Next button to follow next step.


My Email


 Step 6: In Rules Wizard, you have to check box with specific words in the subject, and then click on Next button


Specific Word

Step 7: Now Search Text window will open you can type specific words or phrases to search for in the subject then click on Add button, now next click on OK button.


Search Text


Step 8: Now you have to check option from the long list, here selecting Move it to specified folder.


Select Actions


Step 9: Now you are on next step on Rules Wizard windows where you have to select your exception from the list, and then click on Next button.


Select Actions


Step 10: Now you have to specify your Rules name, now click finally on Finish button.


Finish
Step 11: Now My-Email folder will display all emails which are under our Rule.

my Eamil


Above key steps would definitely help you set rules in outlook.

Conditional Formatting in Excel

$
0
0

This article is written over Excel conditional formatting. This is very useful when we are working on large volume of data. We can separate data as per our circumstances. I am here explaining in detail how to mark duplicate data or specific type. Here is as follow:

Step 1: Launch your Excel through shortcut (Windows + R) or launch through program files.

                    run excel


Step 2: Select range where you need to provide conditional formatting in excel sheet.

Sheet Range


Step 3: On Home menu, there is an icon containing conditional formatting, now drill down conditional formatting menu.

Conditional Formatting


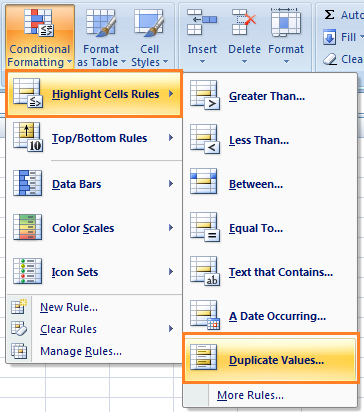
Step 4: Now expand sub menu Highlight Cell Rules, then expand more sub menu Duplicate Values…, now click on it.

                                   Select Duplicate Values

Step 5: Now a popup window will pop up Duplicate Values, Now drill down drop down list, select Duplicate from the list and right side click on values with list, now next select Light Red Fill with Dark Red Text, and click finally on OK button.


Duplicate Values


Step 6: Now on this step, you may check status column, where duplicate is populated light red after conditional formatting.

Status Duplicate


Step 7: Now again another one more formatting of specific word Working is conditional formatting. In the same way above steps, expand Highlight Cell Rules, then expand sub menu Text that Contains…

                                    Text that Contains…

Step 8: Now again a window will popup Text That Contains, now type in text box Format cells that contains the text, in this example Working is typed here, now drill drop down list with, select Green Fill with Dark Green Text, then finally on OK button.


Text That Contains Working

Step 9: Now you can see in the picture where Duplicate, & on specific words conditional formatting is done.

                                    Status
  
Excel work is very essential to our daily routines work, whenever we are dealing with data volume, analyzing data or put data in systematic way, then conditional formatting plays a vital role in manipulating data. 

Export Gridview to Excel

$
0
0
Everyday tons of millions data is manipulated in Excel/CSV across the world daily. I have manipulated data with Excel and CSV in ASP.Net (C#). Normally when we are showing data in Gridview, end user demand from development agency to manipulate data in Excel, CSV. To fulfill this requirement, I have provided best example how can we export data from Gridview to Excel and CSV. I have provide all steps to pull data into Excel/CSV as follows:


Step 1: First bind your Gridview through C# programming, I have shown in snapshot which shows data is showing in Gridview and bottom of Gridview showing two multi talented Button “Export To Excel “ and “Export To CSV”.

Export-To-Excel


Step 2: This step shows Export to CSV Code view, how can we programmatically manipulate data into CSV then it will be able to download.

Export to CSV Code View


Step 3: This step shows how can we programmatically through C# programming manipulate data then downloaded into Excel format. Here is code view


Export to Excel Code View


Step 4: This step shows, how data is showing into excel sheet view.

Export to Excel View


Step 5: Here  you can see that exported data into CSV is showing.

Export to CSV View

Above steps shows how can we Export Gridview to Excel/CSV.
Viewing all 544 articles
Browse latest View live