Quantcast
Channel: .Net Core | MVC | HTML Agility Pack | SQL | Technology Crowds
Viewing all 539 articles
Browse latest View live

Transpose Datatable C#

$
0
0
Dataset and datatable are the lifelines of asp.net (c#). Without data table & dataset we are short, inflexible, expensive, unmanageable and less availability. Recently I dealt greatly with transposed datatable in C#. Data was throwing me in vertical and I need to manipulate data back into horizontally. This is very time consuming to manage the data properly according to our situation, so it needs me to manage transpose datatable in c# according to situation; moreover I motivated to share this one in detail. I have provided steps how can we generate transpose datatable in c# as below: 
using System.Data;

Step 1: In first step, I have added some required .net controls to view transpose datatable in Gridview.

Transponsed datatable Html View

Step 2: I have added some dummy data into inputTable:


        protectedvoidtc_button_Click(object sender, EventArgs e)
        {
            DataTable inputTable = newDataTable();

            inputTable.TableName = "InputTable";

            inputTable.Columns.Add("Name", typeof(System.String));
            inputTable.Columns.Add("Value_Text", typeof(System.String));

            inputTable.Rows.Add("Table_ID", "1");
            inputTable.Rows.Add("Country", "India");
            inputTable.Rows.Add("Country_Flag", "false");
            inputTable.Rows.Add("ReciveID", "2");
            inputTable.Rows.Add("Campaign_ID", "3");

            inputTable.Rows.Add("Table_ID", "2");
            inputTable.Rows.Add("Country", "USA");
            inputTable.Rows.Add("Country_Flag", "false");
            inputTable.Rows.Add("ReciveID", "21");
            inputTable.Rows.Add("Campaign_ID", "22");

            inputTable.Rows.Add("Table_ID", "3");
            inputTable.Rows.Add("Country", "Canada");
            inputTable.Rows.Add("Country_Flag", "false");
            inputTable.Rows.Add("ReciveID", "3");
            inputTable.Rows.Add("Campaign_ID", "31");

            inputTable.Rows.Add("Table_ID", "4");
            inputTable.Rows.Add("Country", "Austria");
            inputTable.Rows.Add("Country_Flag", "false");
            inputTable.Rows.Add("ReciveID", "4");
            inputTable.Rows.Add("Campaign_ID", "41");

            DataTable transposedTable = GenerateTransposedTableinCsharp(inputTable);
            transposedTable.TableName = "TC-TransponsedTable";
            transposedTable.Columns.Remove("Name");
            tc_gvresults.DataSource = transposedTable;
            tc_gvresults.Visible = true;
            tc_gvresults.DataBind();
        }


InputTable


Step 3: Here I have written complete method GenerateTransposedTableinCsharp to generate transpose datatable in C#.

        privateDataTableGenerateTransposedTableinCsharp(DataTableinputTable)
        {
            DataTable outputTable = newDataTable();

            outputTable.Columns.Add(inputTable.Columns[0].ColumnName.ToString());

            foreach (DataRowinRow in inputTable.Rows)
            {
                string newColName = inRow[0].ToString();
                DataColumnCollection columns = outputTable.Columns;

                if (columns.Contains(newColName))
                {
                    // do nothing
                }
                else
                {
                    outputTable.Columns.Add(newColName);
                }
            }

            Int32 iColCount = Convert.ToInt32(iTotalRows(inputTable));
            string _Col = string.Empty;
            string _ColRep = string.Empty;
            Int32 _rCount = 0;
            Int32 _FirstRow = 0;
            Int32 _NewRow = 0;

            for (int rCount = 0; rCount <= iColCount; rCount++)
            {
                DataRow newRow = outputTable.NewRow();
                
                newRow[0] = inputTable.Columns[1].ColumnName.ToString();
                for (intcCount = _rCount; _rCount <= inputTable.Rows.Count - 1; cCount++)
                {
                    if (_FirstRow == 0)
                    {
                        _ColRep = inputTable.Rows[cCount][0].ToString();
                    }

                    if (_FirstRow > 0)
                    {
                        _Col = inputTable.Rows[cCount][0].ToString();
                    }
                    _FirstRow += 1;

                    if (_ColRep == _Col)
                    {
                        _rCount = cCount;
                        _FirstRow = 0;
                        _NewRow = 0;
                        _Col = "";
                        break;
                    }
                    else
                    {
                        string colValue = inputTable.Rows[cCount][1].ToString();
                        newRow[_NewRow + 1] = colValue;
                    }
                    _rCount = _rCount + 1;
                    _NewRow = _NewRow + 1;
                }
                outputTable.Rows.Add(newRow);
            }
            return outputTable;
        }

I have written under above code a helper method to write rows to columns:

        privatedecimaliTotalRows(DataTable inputTable)
        {
            int _FirstRow = 0;
            string _ColRep = "";
            string _Col = "";
            Decimal _RetRows = 0;
            Int32 _TotalRecs = Convert.ToInt32(inputTable.Rows.Count - 1);

            for (int cCount = 0; cCount <= inputTable.Rows.Count - 1; cCount++)
            {
                if (_FirstRow == 0)
                {
                    _ColRep = inputTable.Rows[cCount][0].ToString();
                }

                if (_FirstRow > 0)
                {
                    _Col = inputTable.Rows[cCount][0].ToString();
                }
                if (_ColRep == _Col)
                {
                    Int32iTotRow = cCount;
                    iTotRow = iTotRow + 1;
                    //string _RRows;
                    _RetRows = Convert.ToDecimal(Convert.ToDecimal(_TotalRecs) / Convert.ToDecimal(iTotRow));
                    _RetRows = Math.Ceiling(_RetRows);
                    break;
                }
                _FirstRow += 1;
            }

            return _RetRows;
        }

TC TransponsedTable

Step 4: Now, I have written completely code in code behind and HTML. Next I am ready to hit button “Hit Me!” to bind results into GridView control in C#.

Hit Me!

Step 5:After hitting the button, now transpose table perfectly showing in gridview.

Transponse Table Gridview

Above key steps show how can we generate transpose datatable in c#, if any help more required on it, I am very happy to assist my digital world.

Download sample source files:

Download


Tab Control C# Windows Application

$
0
0

I am demonstrating in this example, how can we use tab control in C# windows application. My recent posts were on Export Gridview to Excel& Transpose Datatable C# now explaining about tab control in c# windows application.

Step 1: Expand Containers tab of Toolbox, then drag Tab Control into your design window.


tab control


Step 2: In next step, click on tab control, and then click on TabPages property of tab control property. TabPages will navigate to popup windows where you can set tab pages names etc.

TabPages


Step 3: Now a popup window open with name TabPage Collection Editor, here in Text property, you can set tab page name, In Name property, you can set ID of the tab page. Consequences, you can set multiple tab pages as per your requirements on click Add button bottom of the window. You can also remove tab on click Remove property vice-verse.

TabPage Collection Editor


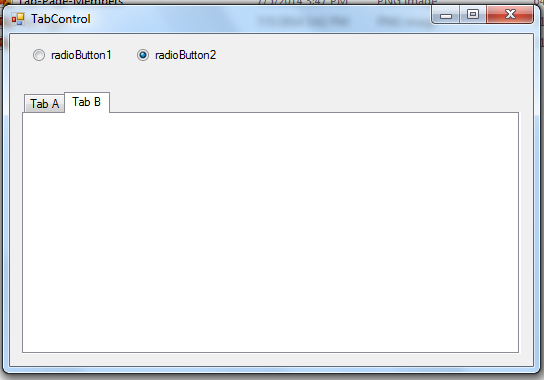
Step 4: Now you can see Tab pages view, here two tab pages are created Tab A and Tab B.

Tab View


Step 5: On particular click on radio button, you can view tab on your specific choice.

Tab B View


How Can we Select Tab in C#, shared code snippet below

       private void radioButton1_Click(object sender, EventArgs e)
        {
            try
            {
                tabControl1.SelectTab("Testtab1");
                tabControl1.SelectedIndex = 0;
                tabControl1.TabPages[0].Show();
                tabControl1.TabPages[1].Hide();
            }
            catch (Exception ex)
            {
                throw ex;
            }
        }

        private void radioButton2_Click(object sender, EventArgs e)
        {
            tabControl1.SelectTab("Testtab2");
            tabControl1.TabPages[1].Hide();
            tabControl1.SelectedIndex = 1;
        }

This example demonstrates how can use tab control in C# Windows application development.

Download Example in Zip 

Download Example Tab Control in Zip

HTTP Error 403.14 - Forbidden in IIS

$
0
0
I am explaining in detail how to resolve issue HTTP Error 403.14 – Forbidden in IIS. Earlier, I have explained in detail about Login failed for user IIS Apppool \Default Apppool, HTTP Error 503. The service is unavailable.

Error Description:

HTTP Error 403.14 - Forbidden
The Web server is configured to not list the contents of this directory.

Step 1: I was working on prominent website, and then I popped up a error in my browser HTTP Error 403.14 – Forbidden. The Web server is configured to not list the contents of this directory.


HTTP Error 403.14 – Forbidden


Step 2: Expand your Connections pane, then click on your specific website, now click on action pane on Directory Browsing to navigate its further properties.

directory browsing


Step 3: Now you can see Actions window in right side, where you can see Enable option to enabledirectory listing in browser.

enable-directory-browsing


Step 4: Now you can see all check boxes are enabled, it means you are in right direction to enable directory browsing.

enabled directory browsing


Step 5: Finally, you can see that directory listing is enabled in our browser. You can see in the picture as below also.

Showing directory list


I have suggested above key steps to resolve issue HTTP Error 403.14 – Forbidden in IIS. I am happy to further assistance if anyone required.

Master And Content Pages in ASP.Net

$
0
0
ASP.Net Master Page’s application allows us to create a consistent layout of the UI. We can create a master page in asp.net application; moreover can create multiple content pages where ever we can display content.
Master page has a extension with .Master

Master page directive


<%@MasterLanguage="C#"AutoEventWireup="true"CodeBehind="TCSite.master.cs"Inherits="slnTCMasterContentPage.TCSite"%>

Content Page Directive

Here code snippet showing page directive for content page.


<%@PageTitle=""Language="C#"MasterPageFile="~/TCSite.Master"AutoEventWireup="true"CodeBehind="WebForm1.aspx.cs"Inherits="slnTCMasterContentPage.WebForm1"%>


In above page directive we are calling master page from content page in asp.net.
Content page contains no markup outside the Content control in asp.net. There is a great flexibility in asp.net that we can create multiple master pages to provide different layouts for our application, we can create multiple content pages of each master page in asp.net.  With Master and content pages we can provide more flexibility to our application, so we can make required modifications in our layout in the middle of development with spending few times.

Step 1: Add Master page, right click in project property, and then click on Add new Item, now you will see Installed Template where you can select Master Page, finally click on OK.

Master Page

Step 2: Now you can right click on Master Page (TCSite.Master), and then click Add Content Page.

Content Page


Step 3: Finally, you can see final view of Content Page.

Content Page View

 Download Sample in Zip: 
https://www.dropbox.com/s/ahivwkmnizmzxos/slnTCMasterContentPage.zip


ASP.Net Interview Questions:


AngularJS JavaScript MVW Framework

$
0
0

Angular History:

AngularJS is quite new language and introduced first time in 2012, Google employee starts to develop it in 2009. Later Google properly take over, funded and full time development on it. Angular JS is easy to learn. It extends HTML with new modern rich features.

Angular JS

 What Needs To Start:

Before to show off your hands in Angular JS, you should have strong hand in HTML, CSS and JavaScript.

What is Angular JS:

AngularJS is a JavaScript MVC framework developed by Google. It is easy to test, highly end user rich experience. Angular Js extends HTML by providing directives. Angular is a perfect for SPAs (Single Page Applications). It also implements two-way data binding, connecting your HTML (views) to your JavaScript objects (models) seamlessly. In simple terms, this means that any update on your model will be immediately reflected in your view without the need for any DOM manipulation or event handling.

Angular JS JavaScript Framework:

AngularJS is written in JavaScript libraries to extend HTML with modern features. Angular JS can be added in our Web Page with script Tag:

<script src="//ajax.googleapis.com/ajax/libs/angularjs/1.2.15/angular.min.js"></script>


 Angular JS Extends JavaScript:

AngularJS extends HTML with its ng-directives.

ng-app directive: It defines an Angular JS application using in our project.

ng-model directive: It binds the value of data with HTML controls (input, list) in our application.

ng-bind directive: It binds our application data to our HTML view.

Main Components of Angular JS

Main components of Angular JS are given below:

1. Directives

This feature enables Angular JS to invent new HTML syntax, very powerful component of Angular JS.

2. Reusable Components

Angular JS uses directives to create reusable code so hide CSS, DOM and its behavior, so you can focus on your look and feel of your application.

3. Localization

This feature allows to Angular JS to multiple locales with the help of stemming and directive.

4. Embeddable

You can embed Angular JS in your application little or more as per your requirements. It does not require complete framework to work with Angular JS. Angular JS is capable to run multiple apps without iframe, you can view source control and can also look around it.

5. Injectable

This does not require any Main() method or start up, you can start from anywhere as per your esteemed requirements. If you don't need feature or need to reduce can perform seamlessly with Angular JS.

6. Testable

It is designed from starting to test up across the network. It supports fully behavior-view separation and pre bundled with mocks , moreover it comes under end-to-end scenarios which helps to understand its core part.

Conclusion

AngularJS is used to build Web apps, Mobile apps etc. Very useful to MVC, Declarative User interface, behavior with declarative, DOM Manipulation etc. It provides great flexibility to builds apps over internet. It is only framework which is not required to bundle the tool.


How to Delete Contraints in SQL Server

$
0
0

Introduction

Suppose we are working with Entity Framework or some very complex database and moreover we don’t have matured database then very tedious work to carry out changes with our back end database in MS SQL Server, so I am proposing this great utility to handle out this problem.


Delete Constraints in SQL Server

Today, I am writing about how to delete constraints in MS SQL Server through single query command. Often of us, spend a lot of time to locate constraints and try to delete constraints one by one, it takes a long time. We wasted our precious development time such type of tedious work and also create some confusions.

Declaring variables required to run SQL query

DECLARE @sql nvarchar(255)
DECLARE@For_TABLE_NAME varchar(50);
DECLARE@CONSTRAINT_NAME varchar(50);

Declare Cursor

DECLAREFor_TABLE_NAME CURSORFOR 

Run Cursor to fetch records from INFORMATION_SCHEMA

SELECT TABLE_NAME,CONSTRAINT_NAME FROMINFORMATION_SCHEMA.TABLE_CONSTRAINTS
OPENFor_TABLE_NAME   ORDERBY TABLE_NAME
FETCHNEXTFROMFor_TABLE_NAME  INTO@For_TABLE_NAME, @CONSTRAINT_NAME    

Run cursor up to end of constraints in our database

WHILE@@FETCH_STATUS=

Close and Deallocate Cursor

Here we close cursor and then deallocate from the memory to optimize our database performance.

CLOSEFor_TABLE_NAME  
DEALLOCATE For_TABLE_NAME

Complete MS SQL Query View:


DECLARE@For_TABLE_NAMEvarchar(50);
DECLARE@sqlvarchar (700);
DECLARE@CONSTRAINT_NAMEvarchar(50);
DECLAREFor_TABLE_NAMECURSORFOR 
SELECTTABLE_NAME,CONSTRAINT_NAMEfromINFORMATION_SCHEMA.TABLE_CONSTRAINTSorderbyTABLE_NAME
OPENFor_TABLE_NAME  
FETCHNEXTFROMFor_TABLE_NAME  INTO@For_TABLE_NAME,@CONSTRAINT_NAME   
WHILE@@FETCH_STATUS= 0  
BEGIN  
          --
               PRINT'fetching next:'+@CONSTRAINT_NAME;
                     PRINT'ready to drop constraint'+@CONSTRAINT_NAME;
                     SELECT    @sql='ALTER TABLE '+@For_TABLE_NAME+' DROP CONSTRAINT '+@CONSTRAINT_NAME
                     from    INFORMATION_SCHEMA.TABLE_CONSTRAINTS
                     exec    sp_executesql@sql
                     PRINT'deleted:'+@CONSTRAINT_NAME;
                     FETCHNEXTFROMFor_TABLE_NAMEINTO@For_TABLE_NAME,@CONSTRAINT_NAME
                     PRINT'fetching next:'+@CONSTRAINT_NAME;
END  

CLOSEFor_TABLE_NAME  
DEALLOCATEFor_TABLE_NAME

Conclusion

So with this query we are fully able to delete all constraints in a single query so that we can save our precious time of our development. It will be helpful to truncate/delete MS SQL Server database objects from our database but one thing keep in mind while run this query, you should make assure that you are in right direction when going towards this powerful action.

MVC ASP.Net Interview Questions And Answers

$
0
0

In this article,  explaining best MVC ASP.Net Interview Questions and Answers as following:

1. Which is the best approach to assign a session in MVC?

A) System.Web.HttpContext.Current.Session["LoginID"] =7;
B) Current.Session["LoginID"] =7;
C) Session["LoginID"] =7;
D) None

2. RedirectToActionPermanent() Method for which Status code represents?

A) 304
B) 302
C) 301
D) 300
E) None

3. RedirectToAction() Method for which Status code represents?

A) 304
B) 302
C) 301
D) 300
E) None

4. What is ActionResult() ?

A) It is an abstract Class
B) It is a Concrete Class
C) Both A and B
D) None

5. What is ViewResult() ?

A) It is an abstract Class
B) It is a Concrete Class
C) Both A and B
D) None

MVC Architecture

6. return View() works like in ASP.Net MVC C# as

A) Server.Transfer()
B) Response.Redirect()
C) Both A and B
D) None

7. RedirectToAction() works like in ASP.Net MVC C# as

A) Server.Transfer()
B) Response.Redirect()
C) Both A and B
D) None

8. In which format data can be return from XML into table ?

A) DataSet
B) Datatable
C) A and B
D) None

9. Can we use view state in MVC ?

A) Yes
B) No
C) Both A & B
D) None

10) What Request Processing technique follows ASP.Net ?

A) Top-Down
B) Down-Up
C) Pipeline
D) Water fall

11) What is DRY principle in ASP.Net ?

A) Don't repeat yourself.
B) Don't revise yourself.
C) both a and b
D) None

12)  What is default authentication in Internet Information Services (IIS)?

A) Standard User
B) Administrator
C) Anonymous
D) None

13) What is the extension of MVC view when using C#?

A) cshtml
B) vbhtml
C) None
D) Both A & B

14) What is the extension of MVC view when using vb.net?

A) cshtml
B) vbhtml
C) None
D) Both A & B

15) How can you comment using Razor Syntax?

A) *@ Comment me *@
B) @* Comment me *@
C) @* Comment me @*
D) *@ Comment me @*
E) None

16. Which Namespace is used for Razor View Engine ?

A) System.Web.Razor
B) System.Web.Mvc.WebFormViewEngine
C) Both A & B
D) None

17. Which Namespace is used for ASPX View Engine ?

A) System.Web.Razor
B) System.Web.Mvc.WebFormViewEngine
C) Both A & B
D) None
MVC Architecture

18. The Razor View Engine uses to render server side content.

A) @
B) <%= %>
C) Both A & B
D) None

19. The ASPX View Engine uses to render server side content.

A) @
B) <%= %>
C) Both A & B
D) None

20. Which is more faster between ASPX View Engine and Razor View Engine.

A) ASPX View Engine
B) Razor View Engine
C) Both A & B
D) None

21. Does Razor Engine supports for TDD ?

A) Yes
B) No
C) None

22. Does ASPX View Engine supports for TDD ?

Conditional Formatting in Excel

$
0
0

This article is written over Excel conditional formatting. This is very useful when we are working on large volume of data. We can separate data as per our circumstances. I am here explaining in detail how to mark duplicate data or specific type. Here is as follow:

Step 1: Launch your Excel through shortcut (Windows + R) or launch through program files.

                    run excel


Step 2: Select range where you need to provide conditional formatting in excel sheet.

Sheet Range


Step 3: On Home menu, there is an icon containing conditional formatting, now drill down conditional formatting menu.

Conditional Formatting


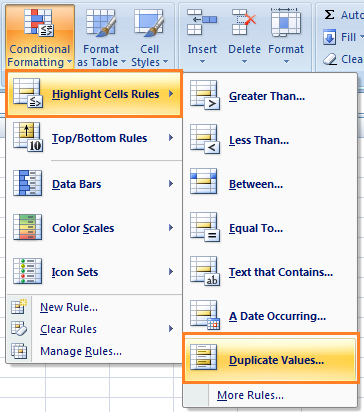
Step 4: Now expand sub menu Highlight Cell Rules, then expand more sub menu Duplicate Values…, now click on it.

                                   Select Duplicate Values

Step 5: Now a popup window will pop up Duplicate Values, Now drill down drop down list, select Duplicate from the list and right side click on values with list, now next select Light Red Fill with Dark Red Text, and click finally on OK button.


Duplicate Values


Step 6: Now on this step, you may check status column, where duplicate is populated light red after conditional formatting.

Status Duplicate


Step 7: Now again another one more formatting of specific word Working is conditional formatting. In the same way above steps, expand Highlight Cell Rules, then expand sub menu Text that Contains…

                                    Text that Contains…

Step 8: Now again a window will popup Text That Contains, now type in text box Format cells that contains the text, in this example Working is typed here, now drill drop down list with, select Green Fill with Dark Green Text, then finally on OK button.


Text That Contains Working

Step 9: Now you can see in the picture where Duplicate, & on specific words conditional formatting is done.

                                    Status
  
Excel work is very essential to our daily routines work, whenever we are dealing with data volume, analyzing data or put data in systematic way, then conditional formatting plays a vital role in manipulating data. 

ArrayList in C#

$
0
0

Introduction

Today, I bet to throw light on ArrayList in C#. ArrayList has great feature because it can increase and decrease its size dynamically. ArrayList accepts also null value, moreover it allows to add duplicate values.

Namespace:

usingSystem.Collections;
using System;


Here is listed an example how we can add items into ArrayList.

privatevoid ArraryListInCSharp()
        {
            ArrayList slist = new ArrayList();
            slist.Add("tc");
            slist.Add("C#");
            slist.Add("asp.net");
            slist.Add("vb.net");
            slist.Add("SQL");
           if (slist.Count == 0)
            {
                MessageBox.Show(slist.Count.ToString());
            }
           
            Int16 iCount = Convert.ToInt16(slist.Count - 1);
            for (int i = 0; i <= slist.Count - 1; i++)
            {
                label1.Text = label1.Text + slist[i].ToString() + ", ";
            }
        }

ArrayList in C#


In this example below, showing how we can we remove single item from ArrayList.

        privatevoid Remove_Item_in_CSharp()
        {
            // Declare array
            List<int> TC = newList<int>();

            // adding element in arraylist
            TC.Add(7);
            TC.Add(9);
            TC.Add(18);
            TC.Add(27);
            TC.Add(72);

            // removing item from list
            TC.RemoveAll(item => item == 9);

            /* Output would be like as below:
             7
             18
             27
             72
     */
        }

Here another example in row, how can we remove item from ArrayList in specific range, showing below example gracefully.

        privatevoid Remove_Range_In_CSharp()
        {
            // Declare array
            List<int> TC = newList<int>();

            // adding element in arraylist
            TC.Add(7);
            TC.Add(9);
            TC.Add(18);
            TC.Add(27);
            TC.Add(72);

            // remove range to remove item in c#
            TC.RemoveRange(0, 3);

            // Output
            // 72
        }

Now finally demonstrating how to add items in LinkedList as following:

        privatevoid Linked_List_In_CSharp()
        {
            // Declare Linkedlist
            LinkedList<string> TC = newLinkedList<string>();

            // adding element in Linkedlist
            TC.AddLast("C#");
            TC.AddLast("SilverLight");
            TC.AddLast("MVC");
            TC.AddFirst("Windows Apps");

            // accessing each item in for loop
            foreach (var _itemTC in TC)
            {
                Console.WriteLine(_itemTC);
            }

            // ***Output will be as follow***
            // Windows Apps
            // C#
            // SilverLight
            // MVC
        }

Conclusion:


In above example, I have explained in detail about Add item in ArrayList, Remove single item from ArrayList, remove items range from ArrayList then finally demonstrate about LinkedList.

OOPS, ASP.Net Interview Questions and Answers:

DataTable in C#

$
0
0

Introduction

DataTable is formed with rows and columns, it stored the data in the same way as stored others objects in C#.

Namespace

If we are dealing with DataTable in C# then we require to define following Namespace in our C# program.

using System;

using System.Data;

Here demonstrating to get columns name from a DataTable.

privatevoidGet_Column_name()
{
            // Declare data table
            DataTable _ dtTC = newDataTable();
             
          // get column name using with foreach loop
           foreach(DataColumn _Cols in _dtTC.Columns)
            {
                string _str_Col_name = _Cols.ColumnName;
            }

}

DataTable In C#

Another method to select data from a specific DataTable in C#.

        privatevoidSelect_Data_From_Datatable_In_CSharp()
        {
            // Declare data table
            DataTable _dtSelectTC = newDataTable();

            // add column to data table
            _dtSelectTC.Columns.Add("ID", typeof(Int32));

            // adding rows to data table
            _dtSelectTC.Rows.Add(10);
            _dtSelectTC.Rows.Add(20);
            _dtSelectTC.Rows.Add(30);
            _dtSelectTC.Rows.Add(40);
            _dtSelectTC.Rows.Add(50);

            // filtering data on demand
            DataRow[] _resultTc = _dtSelectTC.Select("ID > 30");

            // Display results
            foreach (DataRow _rowTc in _resultTc)
            {
                Console.Write(_rowTc[0] + "\n");
            }

            // Output
            // 40
            // 50
        }

Conclusion

I have explained in detail about DataTable in C#, it uses system.Data to define DataTable and further uses of its properties, constraints etc. We can use “Clear “ method to clear data from DataTable, “Clone” helps us to cloning of a DataTable with structure and data, “Copy” copies its data with schema.

Suggested Reading:


The underlying provider failed on open

$
0
0

Introduction

I am today providing resolution of The underlying provider failed on open problem when we are working on across the network. If you see inner exception message then you will find below error description in detail. This problem occurs mostly when we are working with Entity Framework with MVC, ASP.Net, Windows Forms, WPF etc. This issue can be encountered mentioned scenarios. I am also written in detail associated with issue   Could not open a connection to SQL Server.

Error Description

{"A network-related or instance-specific error occurred while establishing a connection to SQL Server. The server was not found or was not accessible. 
Verify that the instance name is correct and that SQL Server is configured to allow remote connections. 
(provider: Named Pipes Provider, error: 40 - Could not open a connection to SQL Server)"}


Step 1: Click (Windows + R) to run program quickly and type "dcomcnfg" then click OK button.

dcomcnfg


Step 2:Now you will see Component Services screen, further expand it Distributed Transaction Coordinator.


Distributed Transaction Coordinator


Step 3: Now right click on Local DTC and click on Properties.


Local DTC


Step 4: Now you will see Local DTC Properties window and click on Security tab, under Transaction Manager Communication section tick option Allow Inbound and Allow Outbound and then finally click on OK button.

Transaction Manager Communication

if above Four steps does not work for you then I am throwing shade of my previous article on error Could not open a connection to SQL Server which explains step by step with great description, I am listing main steps here also.

  1. Check for SQL Server (MSSQLSERVER) service whether it is running or
  2. Check for SQL Server Browser service to working fine.
  3. Check for Aliases.
  4. Check for SQL Server Default Port 1433 is preserving or not.
  5. Check for Allow remote connections to this server.
  6. Ping for your IP Host Address whether it is responding or not.
  7. You can check for Windows log detail tying in quick window EVENTVWR to investigate into issue very closely.

Summary

I have provided above two approaches to resolve the issue The underlying provider failed on open, I have already written in detail to resolve associated with this issue  Could not open a connection to SQL Server  , if you still does not resolve this issue, you can write your error with detail so can help accordingly.

Suggested Reading


RDLC reports in C#

$
0
0

Introduction

Here is explained in detail to generate RDLC reports in C#, RDLC is very good business intelligence (BI) tool. RDLC is the best component to display reports in tabular form.

Step 1: Add new project, select Windows Desktop, then select Windows Forms Application and type solution name and then finally click on OK button.

Create Solution for RDLC Report


Step 2: Now right click on your solution and click option add new item then window will appear, now at right hand side select Reporting and then click on Reporting, type RDLC report name Report1.RDLC and finally hit Add button.

RDLC Report


Step 3: Now click on Toolbox and expand Data, now add BindingSource to your solution.

Binding Source

Step 4: Now mouse right click, Click on Add, next sub menu TableAdapter option.

tableAdapter1

Step 5: Now TableAdapter Configuration Wizard will open, here you can see various DataTable properties and then click on Finish button.

TableAdapter Configuration Wizard

Step 6: Here you can select Choose a Command type, three main Command Types are as follows:
  1. Use SQL Statements
  2. Create a new Stored Procedure
  3. Use Existing Stored Procedure
I am going with SQL statements, Click on Next button.

Choose a Command Type

Save the Connection String to the Application Config File

Keep checked the checbox to store the connection string into application config file.
Choose Methods to Generate
There are three returning methods:
  • Fill a DataTable
  • Return a DataTable
  • Create Methods to send updates directly to the database (GenerateDBDirectMethods)
  • Finally click on Next button.
TableAdapter Configuration Wizard

Choose Your Data Connection

Here you can create your database connection on New Connection button, there are options to save connection string into config file or not, here I am clicking on Yes to save connection string into application config file, then click on Next button.

Choose Data Connection


Step 7: Now move to RDLC report, mouse right click, click on Insert option then click on sub option Table.
Insert Table

Dataset Properties

Here you can type your dataset name “DataSet1” and can provide Data Source then you can select Available Datasets from drop down, click on OK button.

Dataset Properties

Step 8: Now select Data Sources, here you can see table entities, now drop these entities to RDLC report to populate.

Datasources

Step 9: Now right click on Table, here you can add Page Header, Page Footer

RDLC header footer

Step 10: Here now you can see report is populated City Primary Key, City Name, In page header you can provide RDLC Report (City Details).

RDLC Report Design Preview

Step 11: Again click on Toolbox, Go to Reporting option, from here drag ReportViewer onto C# forms where you have to populate reports.

Report Viewer

Step 12: Now right click on ReportViewer, you have to provide Data source and Choose Report Name.

Report Viewer

Step 13: Now you have to compile your application and run finally to see RDLC Reports final results.

City Details

RDLC Report Main Components

Here you can see main binding source of the project which are displaying in your project task bar.

dataReport

Summary

Above steps shows in detail how can we generate RDLC reports in C#.

Download Example in Zip

Database Script is under folder db_Script
Development Environment: Visual Studio 2013, .NET Framework Version 4.5, MS SQL Server 2012 

Relevant Reading

SQL Error: Saving Changes not permitted in SQL Server

$
0
0

Introduction

Today, I am explaining about error saving Changes is not permitted in MS SQL Server, to authorize this permission you have to un-check check box under Tools >> Options menus. If we keep it checked then it will not allow us to change data type during the development so that we require to frequent change or specific requirement then we required it immediately.

Error Description

Saving changes is not permitted. The changes you have made require the following tables to be dropped and re-created. You have either made changes to a table that can't be re-created or enabled the option Prevent saving changes that require the table to be re-created.

Saving Changes not permitted in SQL Server


Assumptions

You already know about how to connect SQL Server and create Database Tables and some other operations.

Connect to Server

Assuming you have already connected to Microsoft SQL Server Management Studio (MS SQL Server)

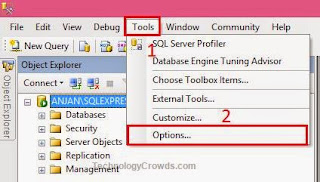
Go to Tools Menu then click on Sub Menu Options

SQL Tool Option

Now go to Tools Menu and then click on Sub Menu Options which will lead you to required setting into your MS SQL Server.

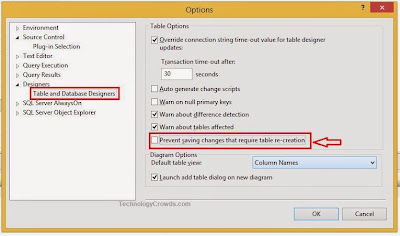
Table and Database Designers

Now navigate to left pane and expand Designers then click on Table and Database Designers, now you will see Table Options in right hand side, un-check option Prevent saving changes and require table re-creation then click on OK button.

Table And Database Designers

Summary

Explained in depth to resolve issue saving Changes is not permitted in MS SQL Server. If anyone still have any issue or clarification the let me know.

Suggested Reading


Internet Browser: Internet Explorer replacing with Microsoft Edge in Windows 10

$
0
0

Introduction

Microsoft has introduced replacing Internet Explorer with Microsoft Edge in Windows 10 operating System. Microsoft Edge is fully capable to run seamlessly across multiple devices.

Cutting off ActiveX and BHOs

ActiveX are dropping off by new look of Microsoft Edge replacing of old Internet Explorer.
ActiveX contains mainly plugin of Flash, Silver light, Java and PDF plugins. Main reason to dropping off ActiveX is to come off fully of HTML 5 of today brilliant demand to run the content over internet browser across the multiple devices.
Now flash will work alike same as Chrome provides, now Microsoft Edge will provide PDF in native language.

BHO (Browser Helper Objects)

Microsoft Edge now get rid of BHO (Browser Helper Objects), now you will not see toolbar like ASK.com etc in Internet Explorer but still Microsoft offer let developer to develop HTML and JavaScript based extensions.

Code Cut Off Lines

Microsoft Edge now removed 220,000 unique lines from code and over 300 APIs but Microsoft Edge added over 3,00,000 new lines added in new code (Microsoft Edge).

Now Microsoft wave off of old ActiveX and BHO (Browser Helper Objects) and introducing new browser to keep in mind to across multiple platform so can work seamlessly in different operating system. Microsoft Edge is fully quipped of HTML/JavaScript is fully support of HTML 5. Microsoft now letting Microsoft Edge to automatic updates alike Chrome, Firefox etc.

Microsoft Edge Security

Microsoft Edge is fully equipped with security to provide secure internet experience ever in the history. Following are the keys points which help to keep up the security measurement of Microsoft Edge.

Web Security Threats


  • Defend Users Against Trickery
  • Stronger, More Convenient Credentials
  • Defending Against Malicious Web Sites and Downloads
  • Defending Against Fake Sites with Certificate Reputation
  • Web Standards
  • Defending the Browser Against Hacking
  • Moving to a more secure extension model
  • Microsoft Edge is an App
  • App Container Sandbox by Default
  • 64-bit By Default
  • Defending Against Memory Corruption
  • MemGC
  • Control Flow Guard
  • Bug Bounty

Summary

Waiting to come off Microsoft Edge with Windows 10 later to this summer. Microsoft Edge is also introducing with new logo to replacing with old one of Internet Explorer logo.

Microsoft Edge Logo
Courtesy: https://creativemarket.com/blog/2015/04/29/why-the-ugly-new-microsoft-edge-logo-is-genius

Relevant Reading

SMTP Server: Authentication the Server Response was 5.5.1 Authentication required in gmail

$
0
0

Introduction

I was working on MVC (C#) application sending email through Gmail Server, meanwhile popped up me issue the server response was 5.5.1 authentication required, So we required action to set on security issue which is default off in Gmail Email settings.

Error Description

An exception of type 'System.Net.Mail.SmtpException' occurred in System.dll but was not handled in user code
Additional information: The SMTP server requires a secure connection or the client was not authenticated. The server response was: 5.5.1 Authentication Required.

Gmail Code Snippet

Below is the code snippet using to send Email through Gmail Host:

[HttpPost]
public JsonResult SendEmail(string _name, string _phone, string _email, string _description)
{
string senderID = "youtemail@gmail.com";
string senderPassword = "demo#123";
string result = "Email Sent Successfully";

string body = "" + _name + " has sent an email from " + _email;
body += "Phone : " + _phone;
body += _description;
try
{
MailMessage mail = new MailMessage();
mail.To.Add(senderID);
mail.From = new MailAddress(senderID);
mail.Subject = "My Test Email!";
mail.Body = body;
mail.IsBodyHtml = true;
SmtpClient smtp = new SmtpClient();
smtp.Host = "smtp.gmail.com"; //Or Your SMTP Server Address
smtp.Credentials = new System.Net.NetworkCredential(senderID, senderPassword);
smtp.Port = 587;
smtp.EnableSsl = true;
smtp.Send(mail);
}
catch (Exception ex)
{
result = "problem occurred";
Response.Write("Exception in sendEmail:" + ex.Message);
}
return Json(result);
}

First login into Gmail Account from which Gmail credentials are you using to send email.

Now go to Gmail Settings Feature, it comes in your Gmail Inbox on right side, as you see in picture below. 
Gmail Settings

Move to Security Feature

Now click on Gmail Setting Feature, move to security feature or alternatively can hit/paste this URL in your browser https://www.google.com/settings/security/lesssecureapps where you can see settings. 

Access for less secure apps

  1. Turn off (default) 
  2. Turn On  
Access for less secure apps

Click on Turn On option to authorize emails sending through while programming (MVC, C#, PHP, Java etc.) with required credentials in Gmail account.

Summary

Above will help to resolve issue the server response was 5.5.1 authentication required while sending email through Gmail credentials in programming languages like ASP.Net, MVC, C#, PHP, Java etc.

Relevant Reading:


Entity Framework Error: Validation failed for one or more entities

$
0
0

Introduction

While working on C# app using Entity Framework, I got the issue Validation failed for one or more entities. Today, I have provided a complete solution to over come issue Validation failed for one or more entities while playing with Entity Framework (MS SQL Server database) using C#, MVC, ASP.Net, VN.net etc.

Exception Event

try
{
// doing here my logic
_context.savechanges();
}
catch (DbEntityValidationException dbEx)
{
foreach (var validationErrors in dbEx.EntityValidationErrors)
{
foreach (var validationError in validationErrors.ValidationErrors)
{
Trace.TraceInformation("Property: {0} Error: {1}", validationError.PropertyName, validationError.ErrorMessage);
}
}
}

Error Description

DbEntityValidationException was caught
Validation failed for one or more entities. See 'EntityValidationErrors' property for more details.

Solution

This error occurs because data type length was short and I was trying long data to insert in to that particular column, when I went into deeply analysis then came up that data length is short in database so it requires to increase data storage capacity. While increase the length in database and save the database table then try again with same input data then it starts working fine. I have increased FirstName data Type length nvarchar(20) to nvarchar(50).

Validation failed for one or more entities

Conclusion

Error Validation failed for one or more entities often occurred while working in MVC, C#, ASP.Net application using Entity Framework (MS SQL Database, MySQL, Oracle, MongoDB etc). Above mentioned solution in detail would resolve your issue perfectly, if anymore help required anyone can approach me.

Relevant Reading

Entity Framework Examples:Entity Framework Code First Examples

$
0
0

Introduction

Entity Framework is an ORM (Object Relational Mapper) which enables to developer cut off code lines. ADO.Net Entity Framework is now every C#/VB apps necessity to use in MVC, ASP.Net, and Windows applications etc. Here is explained operations with code first approach.
Main Operations (CRUD) in Entity Framework is demonstrated below with code snippet.

Pre-Requisites

If you need these snippet into your machine then require following VS 2012/2013, .Net Framework 4.5 and MS SQL Server.

Installing EF NuGet Package

Right click on Reference folder of your respective project to install Entity Framework NuGet Package and select "Manage NuGet Packages"

Installing through Package Manger Console

Alternatively, you can install Entity Framework  through Package Manger Console.
PM> Install-Package EntityFramework

Download Latest Entity Framework

Here is an official link https://www.nuget.org/packages/EntityFramework/ where you can download latest Entity Framework package.

Entity Framework Version History

Here is the complete story of all Entity Framework Versions. Top most in the list are latest versions.

EntityFramework 7.0.0-beta4
EntityFramework 6.1.3 (this version)
EntityFramework 6.1.3-beta1
EntityFramework 6.1.2
EntityFramework 6.1.2-beta2
EntityFramework 6.1.2-beta1
EntityFramework 6.1.1
EntityFramework 6.1.0
EntityFramework 6.0.2
EntityFramework 6.0.1
EntityFramework 6.0.0
EntityFramework 6.0.0-rc1
EntityFramework 6.0.0-beta1
EntityFramework 6.0.0-alpha3
EntityFramework 6.0.0-alpha2
EntityFramework 6.0.0-alpha1
EntityFramework 5.0.0
EntityFramework 5.0.0-rc
EntityFramework 5.0.0-beta2
EntityFramework 5.0.0-beta1
EntityFramework 4.3.1
EntityFramework 4.3.0
EntityFramework 4.3.0-beta1
EntityFramework 4.2.0
EntityFramework 4.1.10715
EntityFramework 4.1.10331
EntityFramework 4.1.10311

USE EntityFramework connection in ADO.Net Connection

Use Namespace

using System.Data.EntityClient

Use following code snippet to use Entity Framework connection in ADO.Net Connection

string _entityConnString = ConfigurationManager.ConnectionStrings["db_MyDatabase"].ConnectionString;
string _AdoConnString = new EntityConnectionStringBuilder(_entityConnString).ProviderConnectionString;

How to take Maximum Table ID in Database Table using Entity Framework

_context is object of Entity Framework dbContext

Entity Framework dbContext

Delclaring Object of dbContext

Model1 _context = new Model1();
Int32 _TopicIDFK = _context.myTable.Select(x => x.TableID).Max();

How to Delete Records from Database table using Enity Framework

var _item = (from c in _context.mytable.where(x=> x.id = 10) select c).FirstOrDefault();
_context.tblmyTable.Attach(_item);
_context.tblmyTable.Remove(_item);
_context.SaveChanges();

How to Save Records in Database Table using Entity Framework

var _obj = new tblmyTable();
_obj.TableID = 0;
_obj.Name = txtName.Text.Trim();
_context.tblmyTable.Add(_obj);
_context.Entry(_obj).State = EntityState.Added;
_context.SaveChanges();

How to Update/Modify Records in Database Table using Entity Framework

var _obj = new tblmyTable();
_obj = (from c in _context.tblmyTable.Where(x => x.ID == 10) select c).FirstOrDefault();
obj.ID = 10;
_obj.Name = txtName.Text.Trim();

_context.tblmyTable.Add(_obj);
_context.Entry(_obj).State = EntityState.Modified;
_context.SaveChanges();
How to Check Existing Records from database Table using Entity Framework
bool existsOption = _dtOptions.Select().ToList().Exists(row => row["Options"].ToString() == "technology");

How to run ADO.Net SQL Query using Entity Framework

string _sql = "select * from tblmyTable where ID in (" + _ids + ")";
var _img = _context.Set().SqlQuery(_sql);

How to take First Value from Database Table using Entity Framework

_IdQues = _context.tblmyTable.Select(u => u.QuestionIDPK).First();

How to count number of records using Entity Framework

_countQues = _context.tblmyTable.Where(u => u.ClassIDFK == _class && u.SubjectIDFK == _subject && u.ChapterIDFK == _chap && u.QuizIDFK == _quiz && u.isRecStatus == true).Count();

Rename Column Name in Database Table using Entity Framework

var query = (from c in _context.tblmyTable.Where(x => x.ID > 5).OrderBy(x => x.CountryIDPK) select new {Code = c.CountryIDPK, c.CountryName }).ToList();

How to take Distinct Records from database Table using Entity Framework

var result = EFContext.TestAddresses.Select(m => m.Name).Distinct();

How to Pattern Matching using Entity Framework

var _results = from a in mycontainer.users where a.fullname.Contains(mySearchText) select a.fullname;

Summary

Entity Framework provides developer to code access capability so eliminate code lines. Now every .net framework (c#, Vb.net) developer is primary requirement to use Entity Framework in your application (MVC, ASP.Net, Windows applications). Major operations (CRUD) , count records, Maximum number in table, Column Rename etc of Entity Framework are explained above with coding snippet in great depth.
Suggested Reading

Jquery Validation: Numeric Validation using Jquery

$
0
0

Introduction

Today, I am going to explain about numeric validation using Jquery. Jquery plays a great role to validate data at client side without refreshing whole the page. To make your application more user friendly, interactive and soothing then Jquery plays a vital role to fulfill your dreams.
Data Input Text Box

Number :  

While typing in Input box other Numeric showing error message

Numeric Jquery Validation


Jquery Code Snippet


$(document).ready(function () {
//on keypressed in textbox
$("#age").keypress(function (e) {
//if not numeric, then it don't let you type
if (e.which != 8 && e.which != 0 && (e.which < 48 || e.which > 57)) {
//display error message
$("#errmsg").html("Digits Only").show().fadeOut("slow");
return false;
}
});
});

Numeric Jquery CSS Code

#errmsg
{
color: red;
}

Final View of Code Snippet


Conclusion

You did see above how we can validate Numeric Validation using Jquery, it plays great role to make our application robust and interactive over the internet. While our application playing with Browser then Jquery helps us to validate data at browser end.

Suggested Reading


Jquery Validation: Email Validation using Jquery

$
0
0

Introduction

This is my second post on Jquery Validation, In my previous post, I explained in detail about Numeric Validation using Jquery, now I am going to explain about Email Validation using Jquery.

Input Box to input Email


Email Expression Format


/^([\w-\.]+)@((\[[0-9]{1,3}\.[0-9]{1,3}\.[0-9]{1,3}\.)|(([\w-]+\.)+))([a-zA-Z]{2,4}|[0-9]{1,3})(\]?)$/

Above Email expression is used to validate email format expression using Jquery

While Typing Invalid Email Throwing Error Message

Jauery Email Validation

CSS Code For Error Message


#errmsg
{
color: red;
}

Final Code View to validate Email Expression using Jquery


Conclusion

I have explained in detail to review Email Expression Validation using Jquery. Jquery validation is very useful to validate in Browser side (Client Side Validation).

Suggested Reading


TempData vs ViewData vs ViewBag

$
0
0

Introduction

Today, I am explaining about TempData vs ViewData vs Viewbagwhile working in MVC. All three (TempData, ViewData,  ViewBag) terms are used to pass data from controller to View. These all have different  capability to preserve data while passing from Controller to View using MVC application.

ViewBag

  1. ViewBag is used dynamically to pass the data from controller to view.
  2. It is being introduced since C# 4.0 .Net Framework.
  3. ViewData is property of ControllerBase Class in from .Net Framework 4.5 C#.
  4. ViewBag life span is very short. It only lies under current request.
  5. If it redirects then its value becomes null.
  6. It does not required to typecasting for getting data from Controller to View.
  7. ViewBag is slower than ViewData.
//Controller Code snippet
public ActionResult Index()
{
List _TC = new List();
_TC .Add("C#");
_TC .Add("MVC");
_TC .Add("ASP.Net");

ViewBag.Tech = _TC ;
return View();
}

    <% foreach (var _TC in ViewBag.Tech)
    { %>
  • <%: _TC %>

  • <% } %>

ViewData

  1. ViewData is a property of ControllerBase Class.
  2. ViewData is derived from ViewDataDictionary Class.
  3. public ViewDataDictionary ViewData { get; set; }
  4. ViewData is used to pass data from Controller to View.
  5. It preserves the data only current request.
  6. Its value becomes null, if it redirects again.
  7. It is required strictly to typecast to avoid exception of null values.
  8. ViewData is faster than ViewBag.
TempData vs ViewData vs ViewBag

//Controller Code snippet
public ActionResult Index()
{
List _TC = new List();
_TC .Add("C#");
_TC .Add("MVC");
_TC .Add("ASP.Net");

ViewData[“Tech”] = _TC ;
return View();
}

// Page View Code Snippet

    <% foreach (var _TC in ViewData["Tech"] as List)
    { %>
  • <%: _TC %>

  • <% } %>

TempData

  1. TempData is a property of ControllerBase Class.
  2. ViewData is derived from TempDataDictionary Class.
  3. public TempDataDictionary TempData { get; set; }
  4. TempData is main purpose to preserve data from one request to subsequent requests while passing data from one page to another page. 
  5. It is also required typecasting same as ViewData to avoid null exception.
//Controller Code snippet
public ActionResult Index()
{
List _TC = new List();
_TC .Add("C#");
_TC .Add("MVC");
_TC .Add("ASP.Net");

TempData["Technology"] = _TC ;
return RedirectToAction("Tech");
}
public ActionResult Tech()
{
var _model= TempData["ModelName"];
return View(_model);
}

Summary

I have explained about TempData vs ViewData vs ViewBag in complete depth, If I receive any suggestion from audience then most welcome. I think these three terms TempData vs ViewData vs ViewBag is well tried to maintain state in MVC.  All three can use as per our demanding situation. These work greatly while we manipulating data or passing from one controller to another or View so these fulfill our requirements, if we understand these completely, we’ll not face any issue/problem to manipulate data between Controllers/Views in our MVC apps. If any idea about these I’ll accept from my heart.

Relevant Reading

Viewing all 539 articles
Browse latest View live